
Have you ever wanted to travel back in time to see what the Earth was like thousands or millions of years ago? Well, then this post is for you!
A hike on Marys Peak is like a window into Oregon’s geological past. Marys Peak’s rocks, viewpoints, and vegetation, all paint a picture of large-scale changes that occurred in Oregon millions of years ago, and continue to shape the landscape today.
Hiking with Robert (Bob) Lillie—a geophysicist with a knack for interpreting the Oregon landscape—is like having a tour guide along for the journey.
Armed with a simple model of Marys Peak, rock samples, and two books on Oregon Geology authored by Bob, he met me at the Day Use Area on Marys Peak to begin our hike.

The Hike
- Trailhead: Summit Trailhead (Marys Peak Day Use Area)
- Distance: 3.5+ miles (summit loop trail + meadowedge loop trail)
- Elevation Gain: approx 700 feet
- Notes: Northwest Forest Pass is required to park at the Marys Peak Day Use Area where you will find ample parking and pit toilets. There are many additional hiking options on Marys Peak of various length and difficulty.
Marys Peak Rocks
Holding up a labeled bicycle helmet as a model, Bob explained that Marys Peak was made up of several layers of different types of rock, each with unique properties. At the base was black volcanic rock called basalt, followed by thick layers of light colored sandstone and dark shale, and at the top an intrusive rock known as gabbro. This hard gabbro layer, Bob pointed out, is where we would be hiking today.

Cool Rocks
You may recall from middle school science, that igneous rocks form when lava or magma cools and solidifies. However, due to differences in formation and chemistry, not all igneous rocks turn out the same. Bob pulled out some rock samples- gabbro and basalt- and began to explain their differences.
Dark-colored basalt is a low-silica igneous rock that forms from thin, fast-flowing lava (think Hawaiian volcanoes) that cools and hardens quickly— within a few hours to days. Gabbro is also dark-colored with the same low-silica chemical composition as basalt, but forms from magma that cools very slowly below ground, taking 10s to 1000s of years to cool and harden.
The long cooling time allows large crystals to form in gabbro rock. On the other hand, basalt has very fine crystals, making it a bit dull looking and less valuable. Thus, gabbro is used in masonry in Oregon, often as a granite alternative, while basalt is used to gravel roadways.

Putting the rock samples away, Bob and I followed the gravel road part of the summit loop trail upward from the parking lot. Eventually, we reached some gabbro outcroppings, with large crystals glimmering in the sunshine.

Weathering Time
Remember, gabbro forms below ground. According to Bob, two miles of sedimentary layers once covered the now exposed gabbro rock. Of course, that was millions of years ago. So what happened? Where did the sedimentary layers go?
The answer lies in one of the most underappreciated geological processes— weathering an erosion. Weathering is the breakdown of rock by contact with the atmosphere, hydrosphere, and biosphere. Basically, exposed rocks get worn down over time with a little help from the environment. This weathered material can then be eroded (moved away by wind and water), uncovering more rock that lies below. Sedimentary rock weathers and erodes easily, while igneous rock such as gabbro is much harder.
“Look up,” Bob exclaimed, “imagine two miles of sedimentary rock pushing down from above you.”
The slow action of weathering and erosion removed it all! What a load off!
Mini-Yosemite
As we hiked along the gabbro rock gardens, Bob pointed to some rounded outcroppings of gabbro rock that reminded me of pillow basalt— a form of basalt that results from cooling in water. Though pillow basalt can be viewed on the road up to Marys Peak, it made no sense that we would find it here in the gabbro layer. Something else was going on! Bob explained that the answer lies in a process known as spheroidal exfoliation.
With the slow removal of the weight of two miles of sedimentary rock layers, the gabbro sill would have fractured and broke into cubed or rectangular blocks. Then, spheroidal weathering would have taken over—discriminately breaking down the gabbro blocks; wearing down corners more than edges, and edges more than faces; and eventually forming rounded spheres surrounded by concentric “shells” flaking off. Once exposed, these layers may erode and “peel” away layer by layer—much like peeling away the layers of an onion.

Bob compared the rounded rocks on Marys Peak to the huge granite domes (such as Half-Dome) you can see in Yosemite National Park. The same basic mechanisms of exfoliation apply, just on a different scale. Thus, Bob dubbed Marys Peak a “mini-Yosemite” in honor of the striking resemblance.
Hard as a Rock
At about 500 feet above the rest, Marys Peak is the highest mountain in Oregon’s Coast Range. In part, Marys Peak stands out above the other mountains because it is hard-headed or, as Bob puts it—stubborn! Compared to the sedimentary rocks that once covered it, the gabbro on top of Marys Peak is very resistant to weathering and erosion. The stubborn gabbro thus acts as a sort of shield to the elements, allowing the peak to remain prominent.

Island in the Sky
The fact that Marys Peak is “stubborn, has essentially allowed it to maintain its height and, in turn, a cold subalpine climate. Marys Peak, as Bob describes, is “an island in the sky.”
With colder, harsher conditions than other coastal mountains, Marys Peak exists as a remnant of the past. Rather than the typical Coast Range Douglas-fir/hemlock forest, Marys Peak is a botanical anomaly, and a very beautiful one—it has even been designated a Scenic Botanical Special Interest Area.
The meadows, rock gardens, and noble fir forests that make up the upper reaches of Marys Peak are unique to the Coast Range today, but once would have been typical of the region. Botanically speaking, Marys Peak is living in the last ice age that ended about 12,000 years ago. Many subalpine wildflower species are found here. During our hike through the rock garden, Bob and I took note of several: harsh Indian paintbrush, spreading phlox, Cascade desert parsley, and Cardwell’s penstemon, to name a few; and in the meadows- glacier lilies.

Marys Desert?!?
But subalpine flowers were not the only botanical anomaly of note on Marys Peak. As we hiked farther up the summit trail, past most of the rock gardens, Bob pointed out a slightly lower ridge to the left on the south flank of the mountain. Here we found another remnant of the past—a veritable desert!
Some 6,000 to 4,000 years ago, during a warm, dry period, species still found today in the eastern or southern parts of Oregon spread into parts of western Oregon. Later, as the climate again shifted toward cooler and wetter, most of these—what are known as xeric species—retreated back. But this outcropping- with it’s thin, rocky soil (thanks again to stubborn gabbro) and it’s harsh, drying winds- held onto its xeric species. The west-facing of this area is especially important because high winds coming from that direction blow away most of the heavy snow blanket that covers other areas near Marys Peak summit.
I was unable to see or identify xeric species from where I stood, but prostate lupine (eastern Oregon species) and sulfur flowered buckwheat (southern Oregon species) are apparently two xeric species to keep an eye out for.

Story Beneath the Scenery
About ½ mile from the start of the trail, we reached the summit of Marys Peak. Ignoring the unsightly communication towers behind us, we looked out into the horizon. The views on Marys Peak are reason number two for visiting—come for the wildflowers, but make sure you stay for the viewpoints (and the geology)!
From the summit, looking to the west, you can see the Pacific Ocean; and to the east the Cascade Volcanoes are prominently on display, with the Willamette Valley in the foreground. With such scenery, it is easy to get caught up in the simple beauty of Oregon.
It’s also the perfect opportunity to start thinking like a geophysicist—which, according to Bob, involves observing the landscape and visualizing what happened beneath Earth’s surface to cause it. Much of geology happens slowly. We can’t watch changes occur, but we can use what we do see to develop inferences regarding the past. Like watching the final scene in a movie, it isn’t too difficult to deduce some of the earlier scenes if you are paying attention. As Bob puts it- “there is a story beneath the scenery.”

Moving Plates
The Earth is composed of about 12 hard tectonic plates that move around on a softer part of the mantle, called the asthenosphere. These plates grind past one another, and they grow and shrink as they move toward, under, and away from each other. The motion is messy, resulting in cracking and folding, as well as earthquakes and even volcanic eruptions. These large-scale motions help explain much of Earth’s formations, including those visible from the top of Marys Peak.
Born in the Ocean
Marys Peak did not start out as a peak. Rather, Marys Peak, and the Coast Range in general, started out as rocks and islands scattered about in the Pacific Ocean. What is now Oregon did not exist 200 million years ago! Over long periods of geological time, the North American plate bulldozed these rocks and islands off the ocean floor, and in the process built Oregon.
As Bob explained, Oregon sits along a convergent plate boundary, where the North American and Juan de Fuca plates have been colliding for millions of years. More importantly, due to differences in density, the oceanic Juan de Fuca Plate has been diving beneath the continental North American Plate—a process known as subduction.
But subduction is not a clean or smooth process. Anything massive that doesn’t fit under North America is scraped off the oceanic plate and added to the continent. These masses of land, called exotic terranes, are responsible for a good portion of Oregon’s land mass, including Marys Peak and most of the coast range.
In the case of Marys Peak, the basalt lava flows and overlying sedimentary rock layers formed in the ocean. Later, as the oceanic plate subducted beneath the western edge of Oregon, magma intruded into these rock layers, forming vertical dikes and horizontal sills of gabbro (like the one that forms the “stubborn” caprock of Marys Peak). As the plate convergence continued, a large block of rock was thrust upward and eastward along the Corvallis Fault. Marys Peak was born!
The other Coast Range mountains visible from Marys Peak summit are similarly composed of volcanic and sedimentary rocks from the ocean that were thrust upward and over the edge of the continent. And like Marys Peak, many of the other high Coast Range mountains are capped by hard, intrusive gabbro.

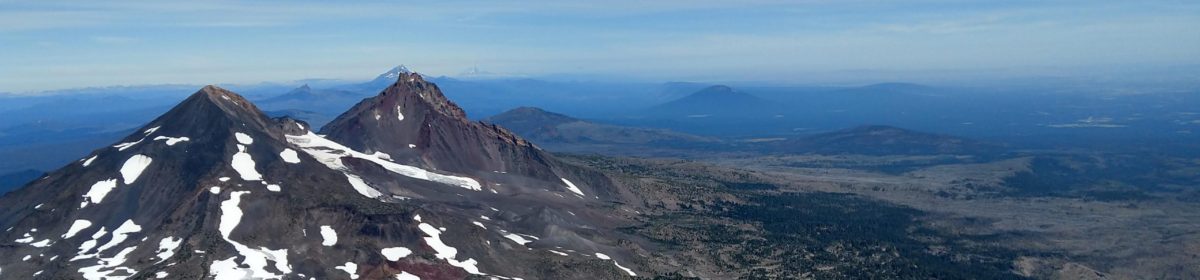
Volcanic Peaks
Marys Peak is not a volcano, but from Marys Peak you can see a great many volcanoes. From our vantage point, Bob and I were able to see Mt. Hood, Mt. Jefferson, and the Three Sisters; and, later in the day, Three Fingered Jack, Mt, Washington, Mt. Bachelor, and Diamond Peak. On clearer days you can also see Mt. Rainer, Mt. St. Helens, Mt. Adams farther north; and Mt. Thielsen, Mt. Mazama (Crater Lake), and Mt. McLoughlin to the south. Marys Peak offers views of most of Washington’s and Oregon’s great Cascade Volcanoes!
I love the Cascade Volcanoes and can’t help but smile anytime I can see them off in the distance. But why are they there? Is there a story beneath the scenery?
Don’t Sweat!
Yep! Once again, plate tectonics provides an explanation.
When an oceanic plate subducts, as is occurring off the Oregon Coast today, it starts to sweat! At about 50 miles below the surface the plate is under so much heat and pressure that it begins to metamorphose and dehydrate. The hot water released reacts chemically with overlying rock, causing it to melt and generate magma. The result is the starting material for repeated volcanic eruptions.
For the last several million years, the Cascade Volcanoes have been fed by the magma generated by the subduction of the Juan de Fuca Plate below the North American Plate. The volcanic peaks have erupted countless times during this time period, building up their cone shapes with each eruption. Though it may seem infrequent on a human timescale, eruptive periods are frequent- with more than 100 Cascade eruptions over the past few thousand years. As long as subduction continues, the Cascades will continue to erupt.

The Dynamic Duo: Uplift and Erosion
As Bob pointed out, while tectonic activity is building up volcanoes and lifting up mountains, the other half of a dynamic duo is tearing it all down. The effects of erosion can also be observed at the summit of Marys Peak.
The Marys Peak region once had an additional two miles of sedimentary rock sitting on top of it! As the land was lifted up, wind, rain and snow were, at the same time, wearing it down. Sedimentary rock is easily eroded, but Marys hard-headedness—aka her gabbro top—is a big reason she remains tall today.
The effects of erosion can also be be observed in the Cascade Volcanoes. When volcanoes become inactive and are no longer being built up by eruptions, they start loosing their tops. Mt. Washington and Mt. Thielsen are great examples of this. Their pointy tops suggest they haven’t erupted in a really long time, as glaciers have etched away their smooth cones. Yes, even volcanoes show signs of aging! One the other hand, Mt. Hood’s symmetrical cone shape is a good indicator of “recent” volcanic activity.
Story of People
After spending several minutes at the top of Marys Peak discussing the “story beneath the scenery,” Bob and I continued our hike, moving downward along the summit trail until we reached the Meadowedge trail junction. Here we took a left and followed the Meadowedge trail.
Toward the end of that loop, Bob stopped me, suggesting one more time we read the landscape.
“What do you see?” He said.
I looked out across a rolling meadow. But with thoughts of plate tectonics running through my head, I overlooked what he wanted me to see. Finally, he pointed it out- a stage!
Following WWII, a group known as the Shriners began holding an annual fundraising event on Marys Peak known as the Marys Peak Trek. Each year thousands of people attended to enjoy food and entertainment. One of the meadows even became a parking lot. The damage was extensive. But by 1983, the Trek ended, and the meadows have had some time to start to recover. Even the earthen stage is easy to miss if you aren’t looking for it.

Bob and I ended our hike by completing the meadowedge loop back to the summit trail, where we hiked through Noble fir forest back to the parking lot where we said our goodbyes.
Back to the Future
I am not ready to say goodbye to Marys Peak.
Marys Peak still faces many challenges. Rare meadows have been encroached on by Noble fir forest, at least in part due to human disturbance. Social trails and wildflower gathering remain a constant threat to the meadows. And then there is climate change, threatening the very existence of this ice-aged ecosystem.
However, there are also many forces working to preserve Marys Peak. Meadows are being restored and Noble fir populations kept in check. Signs and barriers mark sensitive areas. And many local community groups, like the Marys Peak Alliance, are working to educate visitors on the ecological and cultural importance of Marys Peak.
As we look forward to the future of Marys Peak, it is my hope that it remains as it is today: a future set in the past.
Dr. Robert J. (Bob) Lillie is a free-lance writer, science communicator, and interpretive trainer. Bob was a Professor of Geosciences at Oregon State University from 1984 to 2011. He studied geology at the University of Louisiana- Lafayette and Oregon State University while earning his bachelors and masters degrees, and later studied geophysics at Cornell University where he earned his Ph.D.
Bob has written extensively about Pacific Northwest geology in “Beauty from the Beast: Plate Tectonics and the Landscapes of the Pacific Northwest” and “Oregon’s Island in the Sky: Geology Road Guide to Marys Peak.” Both books are available at area bookstores, museums and visitor centers, as well as on amazon.com


